
For a website, sitemap is an important tool for SEO as well as website navigation.
What is a Sitemap?
Sitemap is basically a XML file containing all the links in all of your website. For a general website, the webmaster needs to create “sitemap.xml” and upload it to root directory of his website for make the search engines to index it.
But for blogger, you do not need to generate separate “sitemap.xml” file. It is automatically generated as soon as you start your blog and gets updated automatically when you publish new posts. This is located in “atom.xml” file. To have a look of this, just add “atom.xml” to end of your blog url (immediate after .com, .in, .ru, etc.) in url bar of browser and press Enter.
Why do we need sitemap?
- Sitemap is important for the fact that automatic crawling bots of search engines use "sitemap.xml" file for general websites or “atom.xml” for blogger.com to crawl all webpages of your website. Without crawling, your website is not indexed in search engine listing/results.
- Moreover, you can use it for your website navigation. It can be easily incorporated into webpage to list all your posts to appear in single page which then facilitate visitors to find all on your website.
To have a demo of this beautiful sitemap navigation function, kindly visit:
Sitemap Navigation Demo.
To apply this navigation system to your website, read this detailed tutorial:
How to Generate Sitemaps of Blogger/Blogspot blogs or websites:
Generating sitemaps for blogger.com site is very easy. Unlike generating “sitemap.xml” file and uploading it in root folder of your website, for Blogger, you just need to add following url extension to your blog url:
1. “atom.xml” as like given below:
www.yoursite.blogspot.com/atom.xml
OR,
2. “/feeds/posts/default?=rss” as like given below:
www.yoursite.blogspot.com/feeds/posts/default?=rss
You can use the same process if you are using a custom domain names such as
www.yoursite.com/atom.xml
How to submit the sitemaps to Search Engines:
Submitting sitemaps is very important task from SEO point of view also.
For submitting sitemap to Google:
- First sign in to Google with your Gmail account.
- Go to Google Webmasters home page :
https://www.google.com/webmasters/tools/home?hl=en
- On this page, you will find various sites and blogs created by you.
- Click on the site for which you want to submit sitemap to be indexed by Google Search.
- On the “Site Dashboard” page, Click “Crawl” in the left column and then “Sitemaps”.
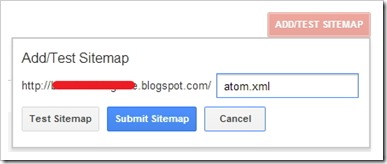
- At top right corner of “Sitemaps” page, click on “ADD/TEST SITEMAPS”.
- Enter “atom.xml” in the text box as like in snapshot below and click “Submit Sitemap”.
- Refresh the webpage after successful submission. Your sitemap will be listed below with “Pending” indexed status.
- Google will crawl your all website.
Note:
You can limit the Google to index to certain numbers of webpage of your website by using following url extension:
atom.xml?max-results=10&redirect=false
This will make Google to index only latest 10 posts. You can replace 10 with number as you like.
For submitting sitemap to Bing:
Use the following url:
www.yoursite.blogspot.com/atom.xml
Note: Although you do not need to create “sitemap.xml” file for BlogSpot websites, still you can generate it by using third party sitemap generators and use it with or without “atom.xml”.


 If you facing errors or problems while embedding Ad Codes from Google Adsense, Adbrite, Chitika, Bidvertiser, etc. in Blogger template, then you are at right place to solve this problem.
